Junit Example Programs in Java
 Reading Time: 7 minutes
Today we're going back to unit testing basics with one of the shorter (but not less useful!) JUnit tutorials about how to set up, write, and run your JUnit tests. What is a JUnit, and how do you get started?
Understand the basics and scale your unit testing practice like a pro with this tutorial.
What Is Unit Testing?
But before we go too much further into JUnits, let's talk a little bit about what is unit testing and regression testing and why they matter in general. We'll get into some good examples as we go on.
Unit testing is a form of white box testing, in which test cases are based on internal structure. The tester chooses inputs to explore particular paths, and determines the appropriate output. The purpose of unit testing is to examine the individual components or pieces of methods/classes to verify functionality, ensuring the behavior is as expected.
The exact scope of a "unit" is often left to interpretation, but a nice rule of thumb is for a unit to contain the least amount of code that performs a standalone task (e.g. a single method or class). There is a good reason that we limit scope when unit testing — if we construct a test that features multiple aspects of a project, we have shifted focus, from functionality of a single method, to interaction between different portions of the code. If the test fails, we don't know why it failed, and we are left wondering whether the point of failure was within the method we were interested in, or in the dependencies associated with that method.
Regression Testing
Complementing unit testing, regression testing makes certain that the latest fix, enhancement, or patch did not break existing functionality, by testing the changes you've made to your code. Changes to code are inevitable, whether they are modifications of existing code, or adding packages for new functionality… your code will certainly change. It is in this change that lies the most danger, so with that in mind, regression testing is a must.
JUnit Basics: Getting Started With JUnit and Using Automation to Create Unit Tests
What Is JUnit?
JUnit is a Java unit testing framework that's one of the best test methods for regression testing. An open-source framework, it is used to write and run repeatable automated tests.
As with anything else, the JUnit testing framework has evolved over time. The major change to make note of is the introduction of annotations that came along with the release of JUnit 4, which provided an increase in organization and readability of JUnits. The rest of this blog post will be written from usages of Junit 4 and 5.
How to Set Up JUnit Testing
So let's dive right in. Here are the steps to set up JUnit.
The more common IDEs, such as Eclipse and IntelliJ, will already have JUnit testing integration installed by default. If one is not using an IDE and perhaps relying solely on a build system such as Maven or Gradle, the installation of Junit 4/5 is handled via the pom.xml or build.gradle, respectively. It is important to note that Junit 5 was split into 3 modules, one of those being a vintage module that supports annotation/syntax of Junit 4 and 3 (although usage of Junit 3 is frankly dismal and typically seen only in much older projects).
JUnit 4
To add JUnit 4 to your Maven, build the following to the pom.xml. Be mindful of version:
<dependency>
<groupId>junit</groupId>
<artifactId>junit</artifactId>
<version>4.12</version>
<scope>test</scope>
</dependency>
For Gradle, add the following to the build.gradle:
apply plugin : 'java'
dependencies {
testCompile 'junit:junit:4.12'
}
JUnit 5
Adding JUnit 5 is a bit different. Because of the modular fashion of JUnit 5, a BOM is used to import all aspects. If only particular classes are needed, individual groups or artifacts can be specified.
To add JUnit 5 to Maven, add the following to pom.xml:
<dependency>
<groupId>org.junit</groupId>
<artifactId>junit-bom</artifactId>
<version>5.2.0</version>
<scope>test</scope>
</dependency>
For Gradle, add the following to the build.gradle:
apply plugin : 'java'
dependencies {
implementation 'org.junit:junit-bom:5.2.0'
}
If you need to manually put on the classpath for JUnit testing, Java needs the raw jar file, although this not typically required. Git houses the code for JUnit. JUnit 4 has the jar available to download directly. Junit 5 (as I am writing this) does not currently have the jar file premade, but one can easily compile the code and generate the jars.
Improve Unit Testing for Java With Automation: Best Practices for Java Developers
Get the Free Ebook
Writing Unit Tests: The Anatomy of a JUnit
Now that we have talked a little about JUnit testing and setup, let's move on to the actual construction and execution of these tests. To best illustrate the creation of JUnits, we want to start with something basic. In the JUnit test example image below, we have a simple method (left) that converts Fahrenheit to Celsius, and the JUnit (right) associated with our method. I've numbered our JUnit and will discuss these sections in detail below.
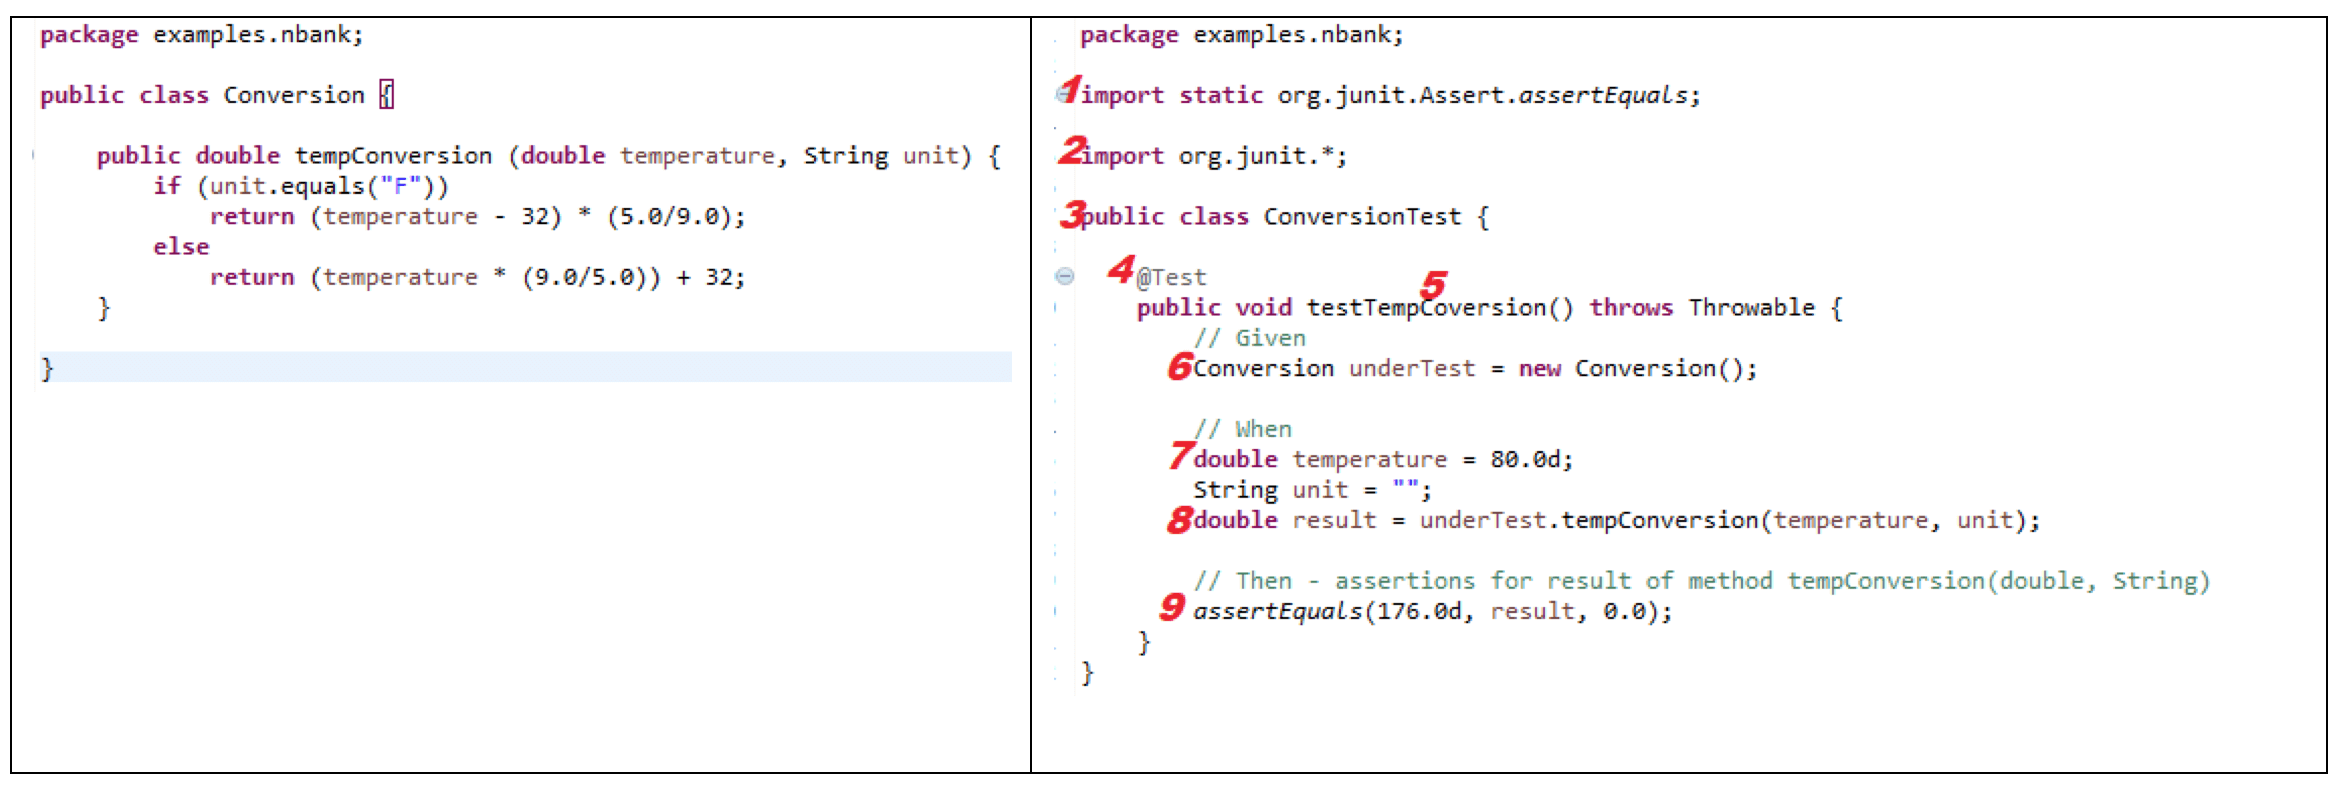
Sections 1 and 2
These are imports for the JUnit libraries needed to leverage the testing framework. The imported libraries can be specified down to a particular functionality of JUnit, but are commonly imported with asterisks to have access to all functionality.
Section 3
This has the start of our test class, the important thing to take note of here is the naming convention for the class, which follows ClassNameTest.
Section 4
Here, we see our first JUnit-specific syntax, an annotation. Annotations are extremely important when creating JUnits. This is how JUnit knows what to do with the processing section of code. In our example case, we have an @Test annotation, which tells JUnit that the public void method to which it is attached can be run as a test case.
There are many other annotations, but the more common are @Before (which runs some statement/precondition before @Test, public void), @After (which runs some statement after @Test, public void e.g. resetting variables, deleting temporary files, variables, etc.), and @Ignore (which ignores some statement during test execution — note that @BeforeClass and @AfterClass are used for running statements before and after all test cases, public static void, respectively).
Section 5:
The take away here is again naming convention. Note the structure, testMethodName.
Section 6:
Here we construct a new instance of our class object. This is necessary so we can call the method we are testing on something. Without this object instance, we cannot test the method.
Section 7:
Variables associated with the method need to be established, so here we declare variables corresponding to our method. These should be given meaningful values (note: if a parameter is an object, one can instantiate it, or mock it), so that our test has meaning.
Section 8:
This variable declaration could be argued as optional, but it's worthwhile for the sake of organization and readability. We assign the results of our method being tested to this variable, using it as needed for assertions and such.
Section 9:
The assert methods (which are part of the org.junit.Assert class) are used in determining pass/fail status of test cases. Only failed assertions are recorded. Like with annotations, there are many assert options. In our example JUnit above, we use assertEquals(expected, actual, delta). This takes in the expected outcome, which the user defines, the actual, which is the result of the method being called, and thedelta, which allows for implementing an allowed deviation between expected and actual values. The purpose of an assertion is validation. Although not required to run your JUnit, failing to add assertions arguably defeats the purpose of your test. Without assertions, you have no verification and at most a smoke test, which gives feedback only when test errors out.
How to Run a JUnit
Choose your own adventure! Here, we will look at three ways to run JUnits: straight from the command line, from the IDE (Eclipse and IntelliJ), and using build systems (Maven and Gradle).
How to Run a JUnit from the Command Line
To run a JUnit directly from the command line, you need a few things: JDK on your path, raw Junit jar file, and the test cases. The command is as follows (this example is for Junit 4):
java -cp /path/to/junit.jar org.junit.runner.JUnitCore <test class name>
NOTE: It's unlikely in a professional setting that one would be running a test manually from the command line, without some build system, but the ability is there.
How to Run a JUnit From the IDE
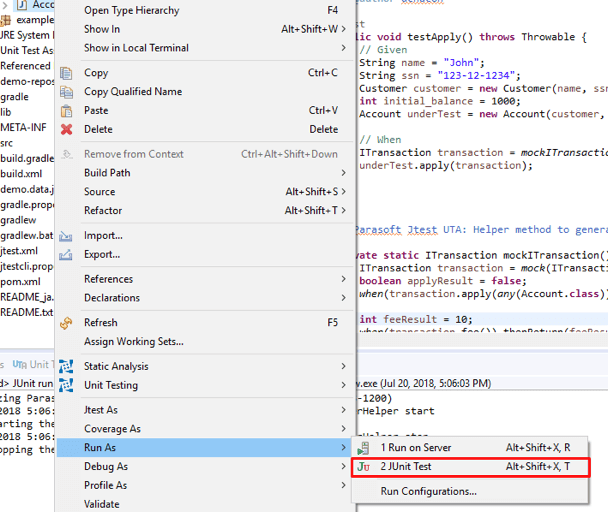
Eclipse
To run from Eclipse, from your Package Explorer locate your JUnit test, in whichever folder you have designated it to. Right-click, and move down to Run As JUnit Test. This will execute your test and open a new JUnit window if not already open.
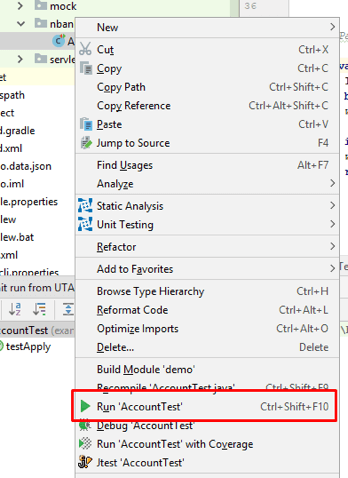
IntelliJ
Running a test in IntelliJ is very similar to Eclipse. From the Project window, locate test, right-click, and select Run 'testName'. Like Eclipse, a JUnit window will open with the results of the test.
How to Run a JUnit Using Build Systems
Maven
Maven has made running tests simple. Ensure you are in the proper location from your command line, and the project pom.xml is properly configured. Then you can run the following to execute your JUnits:
To run entire test suite:
mvn test
To run single/specific test(s):
mvn -Dtest=TestName test
Gradle
Gradle, like maven, has made running tests simple.
To run entire test suite:
gradlew test
To run single/specific test(s):
gradlew -Dtest.single=testName test
NOTE: Maven and Gradle are their own monster — what is shown here is minimal to cover the basics. Check out their documentation if you want to learn more.
Continuing With Unit Testing
Our example ran through a very simple snippet of code, and of course, this is just the start of unit testing. More complex methods call databases or other methods, but to reassure functionality we need isolation, which we achieve through mocking. Mocking helps us isolate units of code to focus our validation (frameworks commonly used for mocking are Mockito and PowerMock). To read more about mocking, read my colleague's post: How to automate a Java unit test, including mocking and assertions.
So, if unit testing is so amazing, why isn't everyone awesome at it? Well, unit testing just isn't easy to implement. It takes a lot of development skill and time, developers tend not to enjoy it very much, and it takes commitment and time to maintain test suites.
But the benefits of unit testing are clear:
- Isolation and focused testing
- Assuring behavior of individual methods or pieces of methods
- Helps to insure addition or modification of code does not break the application
- Boundary analysis – checking for invalid/bad input
- Test every aspect of the method (coverage)
- Coverage
So, it's helpful to deploy powerful unit testing tools like Parasoft Jtest that can remedy much of the issues associated with JUnits and save developers valuable time. Parasoft Jtest's Unit Test Assistant takes on the headache of time, reducing JUnit test generation time by giving the user a guide to create tests with intuitive one-click actions. Maintainability is addressed with automatic recommendations that identify things like unstable test environments (and other risks), assertion recommendations, and more.
To find out more on how you can ease the pain and elevate your unit testing, download a free trial of the Parasoft Jtest Unit Test Assistant. It's free, easy to set up, and you can follow all of the tutorials here to efficiently get started.
JUnit Basics: Getting Started With JUnit and Using Automation to Create Unit Tests
Source: https://www.parasoft.com/blog/junit-tutorial-setting-up-writing-and-running-java-unit-tests/
Post a Comment for "Junit Example Programs in Java"